There are eighty-four postures of yoga, but all people, whether Westerner or Easterner, have done them in the womb of the mother. So you are yogis anyway. – YOGI BHAJAN
Some of the Basic Postures Used in Kundalini Yoga The practice of Kundalini Yoga is done in kriyas and sets, and the effect of a particular exercise is determined by its placement within that set, its relationship to the other exercises in the set, the breath, mantra , mudras, and locks used. The purpose of this section is to help with some of the basic, most commonly used postures in Kundalini Yoga . They are presented in this way: Instruction. Describing how to do the posture. Checkpoints. Tips for getting the most of out a posture, bringing attention to common mistakes, and correcting form and alignment. Remember Yogi Bhajan has said that if a student is not comfortable doing any of the postures, they may skip them, and still receive the benefit of the kriya from the group energy generated by the class . ._ Variation. Some postures appear in different kriyas in different variations, as taught by Yogi Bhajan. Do not interchange one variation of a posture for another, as we do not substitute postures in Kundalini Yoga kriyas. Follow the instructions as given by the Master. In general, with most Kundalini Yoga postures: . .- Neck Lock. Check that the neck is in the proper alignment appropriate to the posture. In general, when sitting erect, Neck Lock should be applied, unless other instruction is given . ._ To end an exercise. In general, inhale deeply and briefly hold, exhale deeply and briefly hold. You may apply mulbandh, unless other instruction is given
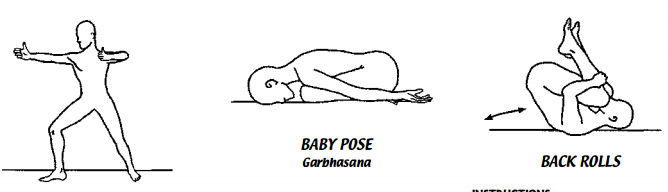
INSTRUCTIONS: Begin in a standing postion. Spread the feet approximately 2-3 feet apart, depending on your size. Place the right foot forward. Place the left foot at right angles to the right foot. Push forward, so that the right knee is over the right toes. Stretch the left leg behind, with the knee straight. Tuck the tailbone under using the internal muscles. Curl the fingers of both hands onto the palms, thumbs pulled back. As if pulling back a bow and arrow, lift the right arm up, extended forward parallel to the ground, over the right knee. The left arm, bent at the elbow, will be “pulling” back. Pull Neck Lock. Chin in, chest out. Do the same posture on the
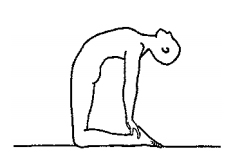
NSTRUCTIONS: Begin by sitting on the heels. Bend forward and place the forehead on the ground, putting pressure on the Third Eye. Arms are at the sides. with palms facing up. STRETCHING BACKWARDS INSTRUCTIONS: Begin in a standing position. Stand with the feel parallel, sitting bones width apart. Inhale and draw the tailbone under, engaging the navel. Stretch the arms above the head. Lenghten the space between the vertebrae as you lean backwards. Legs should be actively working, drawing the kneecaps up towards the hips. Use mulbandh for support and balance. CHECKPOINTS: Do not collapse the lower back. BACK ROLLS INSTRUCTIONS: Begin by lying on the back. Bend the knees up into the chest, pressing them with the arms. Roll on the spine, inhaling forward, exhaling back. CHECKPOINT: If the lower spine is not making contact with the ground, try holding the back of the upper thighs, and press the knees into the chest.
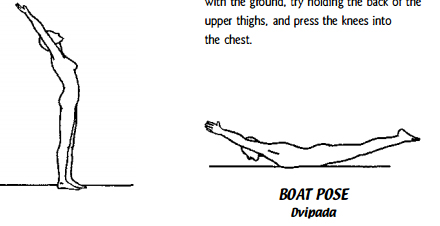
STRETCHING BACKWARDS INSTRUCTIONS: Begin in a standing position. Stand with the feel parallel, sitting bones width apart. Inhale and draw the tailbone under, engaging the navel. Stretch the arms above the head. Lenghten the space between the vertebrae as you lean backwards. Legs should be actively working, drawing the kneecaps up towards the hips. Use mulbandh for support and balance. CHECKPOINTS: Do not collapse the lower back. BACK ROLLS INSTRUCTIONS: Begin by lying on the back. Bend the knees up into the chest, pressing them with the arms. Roll on the spine, inhaling forward, exhaling back. CHECKPOINT: If the lower spine is not making contact with the ground, try holding the back of the upper thighs, and press the knees into the chest. BOAT POSE OVipaaa INSTRUCTIONS: Begin by lying on the stomach. With palms together, stretch the arms out in front. Then lift the arms up. Draw the backs of the upper thighs together, then lift the legs up. CHECKPOINTS: Only the navel stays on the ground. Lengthen out. Imagine someone pulling you from the toes elongating your lower back.
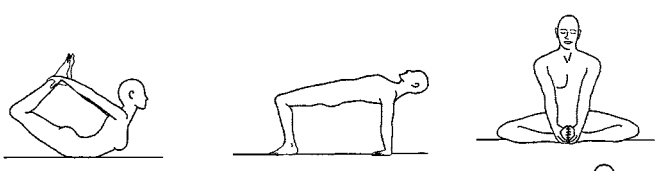
BOW POSE Ohanurasana INSTRUCTIONS: Begin by lying on the stomach. Grab the ankles. and use the thigh muscles to pull the upper body off the ground. Then lift the legs off the ground. As the chest lifts. let the head follow. CHECKPOINTS: Ideally try to get the toe joints together. The knees are a little bit apart. Do not compress the lower back. Try to engage the mulbandh first, then stretch up, so that the back doesn’t compress. Use the legs to pull the arms and to lift the chest up. BRIDGE POSE Setuasana INSTRUCTIONS: Begin in a sitting position, with the legs out in front. Bend the knees. feet flat on the ground, about two fists apart. The arms are behind the body, palms flat on the ground, with the fingertips facing the feet. Lift the hips up. Keep the head up. with Neck Lock. (Note: in some kriyas, it calls for the head to fall back.) CHECKPOINTS: There should be a straight line from the collar bone to the knees. CAMEL POSE Ustrasana INSTRUCTIONS: Begin by sitting on the heels, and rising up onto the knees. Root yourself with the knees, pressing firmly into the earth. Bring the pelvis forward, tilt the tailbone under, lift the heart center, and exhale as you lean back. • 3 ! 2 • KRI INTERNATIONAL TEACHER TRAINING MANUAL LEVEL I BUITERFLY POSE Baddha Konasana INSTRUCTIONS: Begin in Easy Pose. Grab underneath the feet, and hold the soles of the feet together. Pull the spine up. Apply neck lock. Bounce the knees. coordinated with the breath. VARIATION: In some kriyas, it calls for bending forward. lengthening the spine. As with all forward bends, do not lead with the head, initiate with the navel. As you exhale, draw the navel in and up
 CAMEL POSE Ustrasana INSTRUCTIONS: Begin by sitting on the heels, and rising up onto the knees. Root yourself with the knees, pressing firmly into the earth. Bring the pelvis forward, tilt the tailbone under, lift the heart center, and exhale as you lean back. • 3 ! 2 • KRI INTERNATIONAL TEACHER TRAINING MANUAL LEVEL I BUITERFLY POSE Baddha Konasana INSTRUCTIONS: Begin in Easy Pose. Grab underneath the feet, and hold the soles of the feet together. Pull the spine up. Apply neck lock. Bounce the knees. coordinated with the breath. VARIATION: In some kriyas, it calls for bending forward. lengthening the spine. As with all forward bends, do not lead with the head, initiate with the navel. As you exhale, draw the navel in and up. Lift the hips as high as you can. Grab the heels or ankles. Drop the head back. CHECKPOINTS: Do not have the knees too far apart. It is best approximately two fists apart. .
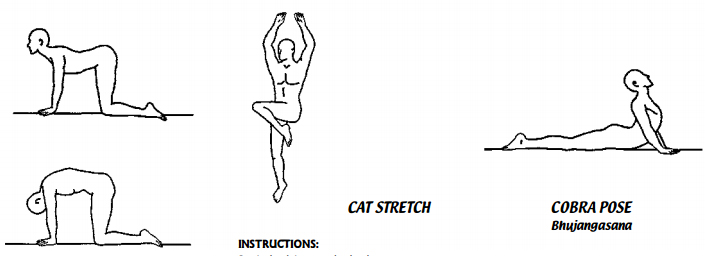
CAT·COW Majariasana INSTRUCTIONS: Begin on the hands and knees. The hands are shoulder-width apart, with fingers facing forward. The knees are directly under the hips. Inhale and tilt the pelvis forward. arching the spine down (cow position). with head and neck stretched back. Do not scrunch the neck. Open the heart and raise the chin as far back as you can without collapsing the neck. Exhale and tilt the pelvis the opposite way, arching the spine up (cat position). pressing the chin into the chest. CHECKPOINTS: Keep the motion smooth, moving from the bottom to the top. The head moves last. Start off slowly, then when the movement is established, you can speed up. You can go as fast as you want, as long as your head moves last. Inhale into the extended position, and hold a little bit of tension at the navel point. This allows for more widening of the ribs. COPYRIGHT YOGI BHAJAN 2003 CAT STRETCH INSTRUCTIONS: Begin by lying on the back. Stretch the arms above the head on the ground. Keeping the shoulders on the ground, pull up one knee and bend it over to the opposite side of the body on the ground. Do the same with the other leg. 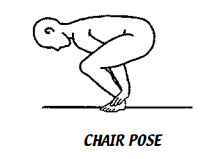 CHAIR POSE INSTRUCTIONS: Begin in a standing position. Feet are shoulder-width apart. Squat down to the point where the thighs are parallel to the ground. Bring the hands through the inside of the legs, and grab towards the toes, placing the palms on top of the feet. CHECKPOINTS: Keep the back straight. Only lift the head and look forward if the heart center is very flexible. Otherwise. apply Neck Lock. COBRA POSE Bhijjangasana INSTRUCTIONS: Begin by lying on the stomach. There are two ways to move into Cobra Pose: I) The classic way. which is ideal: Start out lying on the stomach, hands under the shoulders, palms flat on the ground. Lif the chest and heart up first. and let the head follow as you lean back. Straighten the arms. 2) The real. Try one or more of these tips if you have trouble with the ideal version: Start out in Front Platform Pose. and carefully drop down into Cobra. If you can’t keep your feet together, keep the back of the upper thighs together. If it is difficult to keep your arms straight, bend your elbows. or put your forearms on the ground. Try Cobra Pose with your pelvis off the ground. CHECKPOINTS: Do not let the back overarch. Stretch up across the abdomen and chest, and away from the lower back. It is good to do a counter pose after this, such as Baby Pose or Guru Pranam. KRI INTERNATIONAL TEACHER TRAINING MANUAL LEVEL I •
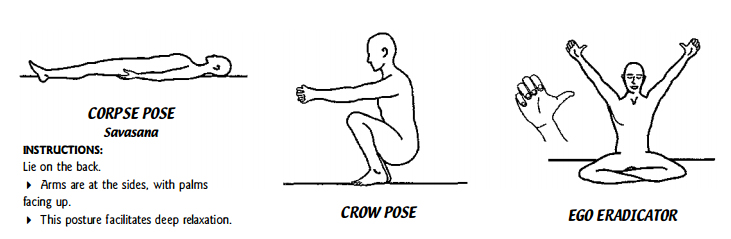
INSTRUCTIONS: Lie on the back. Arms are at the sides, with palms facing up. This posture facilitates deep relaxation. CHECKPOINTS: Never cross the ankles. The legs are not wide apart. Feet should either be a little bit apart, or heels slightly touching. Do not try to breath mechanically. Just let the breath come naturally, letting the abdomen rise and fall. 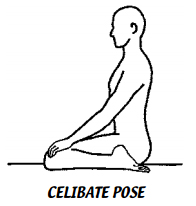 CELIBATE POSE INSTRUCTIONS: Begin by sitting on the heels. Spread the feet far enough apart so that your hips will fit between them. Move slowly, bending your knees, come sitting down with your feet on either side of your hips. CHECKPOINTS: Try to maintain a straight spine. The flexibility should come from the hips, not the knees. This should not hurt the knees. If there is too much pressure on the knees. do not lower the buttocks all the way to the ground. Instead use a block or pil low under the buttocks. CROW POSE INSTRUCTIONS: Begin in a standing position. Squat down. Knees and feet are wide apart, with heels flat on the
 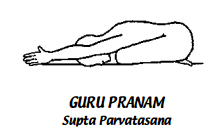 ground. Apply Neck Lock. CHECKPOINTS: The back should be perpendicular to the ground. If you are having difficulty getting down, or keeping your balance, try widening the feet and knees more. If you can’t get the heels down, you may use something underneath your feet. GURU PRANAM Supta Parvatasana INSTRUCTIONS: Begin by sitting on the heels. Bring the forehead to the ground, bending forward by lengthening the core of the spine. Bring the arms out in front, with the palms together. CHECKPOINTS: Lengthen yourself away from the hips. • 3 14 • KRI INTERNATIONAL TEACHER TRAINING MANUAL LEVEL I EGO ERADICATOR INSTRUCTIONS: Begin by sitting on the heels, or in Easy Pose. Apply neck lock. Lift the arms up to 60 degrees. Then draw the shoulder blades down over the back of the ribs, so the shoulders are away from the ears. Curl the fingertips onto the pads of the palms, with the thumbs stretched back. Thumbs aim at each other above the head. To end, touch the thumbs above the head, and open fingers. CHECKPOINTS: Do not bend the elbows. Stretch up from the shoulders. Do not arch the spine. Check the angle of the arms. It is a common mistake to have the arms lower than 60 degrees. VARIATION: Some kriyas call for the palms open, parallel to the ceiling, with wrists pulled back. When doing Ego Eradicator while standing, the angle is thirty degrees, for balance. COPYRIGHT YOGI
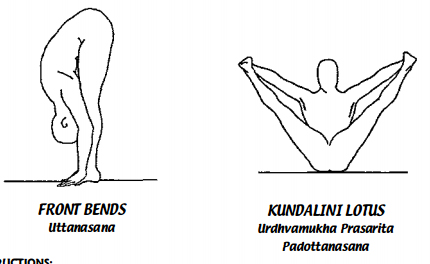
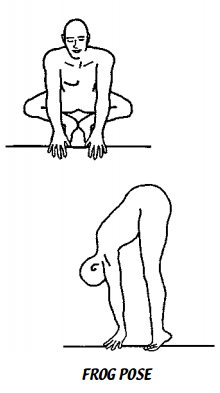
INSTRUCTIONS: Squat down on the toes. The heels are touching, and raised up. Place the fingertips on the ground between the legs. The face is forward. Inhale as you raise the hips up, keeping the fingertips on the ground, heels up, knees locked. Exhale down; face is forward, knees outside of arms. CHECKPOINTS: The movement is rapid. COPYRIGHT YOGI BHAJAN 2003 FRONTBENOS Uttanasana INSTRUCTIONS: Begin in a standing position. Inhale. Lift the spine up. Exhale, bend forward from the navel, continuing to lift and lengthen forward. Lastly, bring the head in towards the legs. Reverse to come up: push the feet into the ground, use the back of the legs to pull yourself up; head comes up last. CHECKPOINTS: Never lead with the head. The navel is drawn in and up with the exhale in order to initiate the forward bend. FISH POSE Supta Virasana INSTRUCTIONS: Begin by sitting on the heels. Lean back using first the hands as support, then the elbows, then resting the shoulders on the ground. CHECKPOINTS FOR BEGINNERS: Remain supported by the elbows or hands. Sit in Easy Pose instead of sitting on the heels. KUNOALINI LOTUS Urahvamukha Prasarita Paaottanasana INSTRUCTIONS: Begin in a sitting position, with the legs out in front. Grab hold of the big toes. Holding onto the toes, lift the legs up and spread them wide, as you straighten the legs. Engage the navel for balance. CHECKPOINTS: Keep the back straight. Do not collapse the spine. Lift the heart center up. Then straighten the legs as much as possible. If you can’t quite achieve the full stretch, it’s better to bend the knees than to collapse the spine. KRI INTERNATIONAL TEACHER TRAINING MANUAL LEVEL I • 3